0%

安裝操作

使用docker buildfile建立VSCode C/CPP docker Image

步驟

  1. Microsoft Dockerhub取得VSCode C/CPP docker

    1
    2
    # Docker buildfile
    FROM mcr.microsoft.com/vscode/devcontainers/cpp:ubuntu-20.04
  2. 安裝GCC/GDB toolchain, CMake

    1
    2
    3
    4
    # Docker buildfile
    RUN apt-get --yes install build-essential
    RUN apt-get --yes install gdb
    RUN apt-get --yes install cmake
  3. 使用範例build.sh安裝Image,安裝完成後,使用範例run.sh執行container

  4. 打開Vscode,選取Remote Explorer->Containers->Dev Containers->C(範例Container name),滑鼠右鍵點選Attach to Container

  5. VsCode打開工作區File->Open Folder

  6. 編寫程式File->New File->main.c

1
2
3
4
5
6
7
#include <stdio.h>
#include <stdlib.h>

void main(void)
{
printf("hello world\n");
}
  1. 執行程式Run->Run Without Debug

    VSCode CMake

  2. 完成上面的Vscode C docker container
  3. 安裝VSCode CMake Extension,Extensions->Search->CMake, CMake Tools
  4. 設定CMake toolchain,View->Command Palette->CMake:Select a Kit->GCC
    或者點選VSCode視窗最下方狀態列工具圖示
  5. 設定CMake Build Target,View->Command Palette->CMake:Set Build Target->Folder name[Executable]
    或者點選VSCode視窗最下方狀態列三角形圖示
  6. 設定CMake Debug,View->Command Palette->CMake:Set Debug Target
  7. 執行程式Run->Run Without Debug
  8. 除錯程式Run->Debug,可在Debug console使用-exec <gdb command>進行除錯,也可透過GUI工具

    範例

Reference

LaunchPad & Debian packaging

PGP(Pretty Good Privacy)

LaunchPad

  • Apply Ubuntu one account. Remember the registed [username]

  • PPA (Personal Package Archives)

    • Register PGP
      • Use the GPG tool to generatePGP Key. Upload it to Ubuntu keyserver

        1
        2
        3
        4
        5
        6
        7
        gpg --gen-key
        gpg --list-sigs
        # 記住sig:[Key ID]與pub:[Public key]
        gpg
        gpg --send-keys --keyserver keyserver.ubuntu.com [Key ID]
        gpg --search-key [[Key ID] --keyserver keyserver.ubuntu.com
        # 要稍微等幾分鐘,才搜尋的到

        The Web page https://keyserver.ubuntu.com/ can search the uploaded PGP. Fill [Key ID] to search it.

      • Open https://launchpad.net/~[username]/+editpgpkeys to regist uploaded PGP.

        1. Fill the uploaded [Public key] in keyserver to Fingerprint Field.

        2. Push Import Key button

        3. Open an email with subject Launchpad: Confirm your OpenPGP Key. Copy the following text and save it as the pgpmsg.txt.

          1
          2
          3
          -----BEGIN PGP MESSAGE-----
          ...
          -----END PGP MESSAGE-----
        4. Use the GPG tool to decrypt it. There is an message contain a URL. Open the URL to regist the imported PGP key.

          1
          gpg -d pgpmsg.txt
  • Git

DEB

  • Debian 套件

    • deb 檔案 (二進制套件)
    • 以有效且合宜的方法來向使用者發佈軟體
    • 是兩個最常見的套件格式之一 (另一個為 RPM)
  • Reference

  • apt-file: search a file’s DEB package source
    https://shengyu7697.github.io/ubuntu-apt-file/

  • How to downoad a DEB package.
    http://samwhelp.github.io/blog/read/linux/ubuntu/package/how-to-download-package/

  • How to get a DEB source package.
    Hit: Open “livepatch”->”軟體與更新”->”Ubuntu軟體”->可由網際網路下載”源碼” first.
    https://www.cyberciti.biz/faq/how-to-get-source-code-of-package-using-the-apt-command-on-debian-or-ubuntu/

  • DEB Binary package https://www.rocksaying.tw/archives/11239791.html

  • DEB source package

    • Reference
      http://www.unixlinux.online/unixlinux/linuxjc/linuxjc/201702/40361.html
      https://www.debian.org/doc/manuals/packaging-tutorial/packaging-tutorial.zh_TW.pdf

    • .dsc file: 3.0 (quilt) - A Debian 3rd package format

    • dhmake

      • single: generate single library
      • independent: generate single library (arch-independent)
    • dh

      • dh_make will generate debian folder with default rules, and would not replace debian folder’s existed files.

      • rules (source/debian/rules)

      • Append install target by override:

        1
        2
        3
        4
        5
        6
        7
        8
        9
        10
        11
        12
        13
        #!/usr/bin/make -f
        %:
        dh $@

        override_dh_auto_clean:
        [ ! -f Makefile ] || $(MAKE) distclean

        override_dh_installdocs:
        dh_installdocs NEWS

        override_dh_auto_install:
        dh_auto_install
        dh_install testing.sh usr/bin
      • execute_after_ Old dh version dosn’t support it Use previous override for it.

      • maintainer script in source/debian/. Example: Create source/debian/postinst and debuild will include it in the binary package

      • W: hello source: maintainer-script-lacks-debhelper-token debian/postinst

        • Solution: Put the #DEBHELPER# in the postinst file’s last line.
  • debuild

    • Modify changelog
      Hint: Only dch --increment/--newversin will use the system enviroment variable DEBEMAIL/DEBFULLNAME

      1
      2
      3
      4
      5
      6
      7
      8
      9
      export DEBFULLNAME=<fullname>
      export DEBEMAIL=<email>
      export DEBKEY=<Key ID>
      dch -i # changelog 會是UNRELEASED,還在修改中沒要上傳時,先保持這個狀態
      # 改code,加資料
      debuild -S -k$DEBKEY
      dch -r # changelog 改成unstable
      debsign -k $DEBKEY hello_2.10-2ubuntu3_source.changes
      dput ppa:neillee1210/home-test hello_2.10-2ubuntu3_source.changes
    • Error from debuild
      Solution: Do “dpkg-source –commit” first. This will put modification/patches to source/debian/patches.

      1
      2
      3
      4
      5
      6
      7
      8
      dpkg-source: 資訊: using source format '3.0 (quilt)'
      dpkg-source: 資訊: building hello using existing ./hello_2.10.orig.tar.gz
      dpkg-source: 警告: executable mode 0775 of 'test.sh' will not be represented in diff
      dpkg-source: 資訊: local changes detected, the modified files are:
      hello-2.10/test.sh
      dpkg-source: 錯誤: aborting due to unexpected upstream changes, see /tmp/hello_2.10-2ubuntu3.diff.2ggaQY
      dpkg-source: 資訊: you can integrate the local changes with dpkg-source --commit
      dpkg-buildpackage: 錯誤: dpkg-source -b . subprocess returned exit status 2
    • Verification

      1. (Error) Error: signing key fingerprint does not exist
        Root cause: Ubuntu PPA is still building.
        Solution: It will disapear after the build Status became “All builds were built successfully.”

        Source Published Status Series Section Build Status
        hello - 2.10-2ubuntu3 (changes file) 2 minutes ago Published Focal Devel All builds were built successfully.
        1
        2
        3
        4
        5
        6
        7
        neil@neil-nb:~/Workspace/Canocial/hello-deb-source-p1$ sudo add-apt-repository ppa:neillee1210/home-test

        更多資訊:<https://launchpad.net/~neillee1210/+archive/ubuntu/home-test>
        請按下 [ENTER] 繼續或 Ctrl-C 取消加入。

        Error: signing key fingerprint does not exist
        Failed to add key.
      2. (Error) Error: 403 Forbidden
        Root cause: Ubuntu PPA doesn’t publish DEB package.
        Solution: It will disapear after the build Status became “Published”

        Source Published Status Series Section Build Status
        hello - 2.10-2ubuntu3 (changes file) 2 minutes ago Published Focal Devel All builds were built successfully.
        1
        2
        3
        4
        5
        6
        7
        8
        9
        10
        11
        12
        13
        14
        15
        16
        17
        18
        19
        20
        21
        22
        23
        24
        25
        26
        27
        28
        neil@neil-nb:~/Downloads$ sudo add-apt-repository ppa:neillee1210/home-test
        更多資訊:<https://launchpad.net/~neillee1210/+archive/ubuntu/home-test>
        請按下 [ENTER] 繼續或 Ctrl-C 取消加入。

        已有:1 <https://dl.google.com/linux/chrome/deb> stable InRelease
        已有:2 <http://packages.microsoft.com/repos/code> stable InRelease
        已有:3 <https://repo.steampowered.com/steam> stable InRelease
        已有:4 <https://download.mono-project.com/repo/ubuntu> stable-bionic InRelease
        已有:5 <https://packages.microsoft.com/repos/ms-teams> stable InRelease
        已有:6 <http://tw.archive.ubuntu.com/ubuntu> focal InRelease
        已有:7 <http://tw.archive.ubuntu.com/ubuntu> focal-updates InRelease
        已有:8 <http://tw.archive.ubuntu.com/ubuntu> focal-backports InRelease
        已有:9 <https://download.docker.com/linux/ubuntu> focal InRelease
        已有:10 <http://ppa.launchpad.net/longsleep/golang-backports/ubuntu> focal InRelease
        下載:11 <http://security.ubuntu.com/ubuntu> focal-security InRelease [114 kB]
        已有:12 <http://archive.ubuntu.com/ubuntu> focal InRelease
        錯誤:13 <http://ppa.launchpad.net/neillee1210/home-test/ubuntu> focal InRelease
        403 Forbidden [IP: 185.125.190.52 80]
        已有:14 <http://ppa.launchpad.net/yannubuntu/boot-repair/ubuntu> focal InRelease
        正在讀取套件清單... 完成
        E: 無法取得 <http://ppa.launchpad.net/neillee1210/home-test/ubuntu/dists/focal/InRelease,403> Forbidden [IP: 185.125.190.52 80]
        E: The repository '<http://ppa.launchpad.net/neillee1210/home-test/ubuntu> focal InRelease' is not signed.
        N: Updating from such a repository can't be done securely, and is therefore disabled by default.
        N: See apt-secure(8) manpage for repository creation and user configuration details.

        commit e69bc87d1d38269515eb0e3dea9fe940e70b847f (HEAD -> master)
        Author: Neil Lee <neil.lee@adlinktech.com>
        Date: Fri Aug 12 22:59:49 2022 +0800
      3. (Error) Got the following error after git clone or checkout source folder and build source by ./configure;make in the source folder.
        Root caluse: Git will not reserve files’ timestamp. After clone or checkout files. the autotool’s related files and source code’s build sequence will be changed. It will cause the building error.

        1
        2
        3
        4
        5
        6
        7
        8
        9
        10
        11
        12
        CDPATH="${ZSH_VERSION+.}:" && cd . && /bin/bash /home/neil/Workspace/Canocial/hello-deb-source/hello-2.10/build-aux/missing aclocal-1.14 -I m4
        /home/neil/Workspace/Canocial/hello-deb-source/hello-2.10/build-aux/missing: line 81: aclocal-1.14: command not found
        WARNING: 'aclocal-1.14' is missing on your system.
        You should only need it if you modified 'acinclude.m4' or
        'configure.ac' or m4 files included by 'configure.ac'.
        The 'aclocal' program is part of the GNU Automake package:
        <http://www.gnu.org/software/automake>
        It also requires GNU Autoconf, GNU m4 and Perl in order to run:
        <http://www.gnu.org/software/autoconf>
        <http://www.gnu.org/software/m4/>
        <http://www.perl.org/>
        make: *** [Makefile:1450:aclocal.m4] 錯誤 127
      • Workaround
        Do autoreconfig -i -f first

      • Solution
        Do not build source in the source code folder directoly.We must re-generate source code folder from the dsc file.

        1
        2
        cd hello-2.10/
        ./configure; make; debuild -us -uc
    • Reference

Example

GIT Repository URL

1
git clone https://git.launchpad.net/~neillee1210/+git/home-test 

LaunchPad PPA URL

  • Adding this PPA to your system by
1
2
sudo add-apt-repository ppa:neillee1210/home-test
sudo apt update
  • Or update PPA URL to system’s software sources.
1
2
deb https://ppa.launchpadcontent.net/neillee1210/home-test/ubuntu focal main 
deb-src https://ppa.launchpadcontent.net/neillee1210/home-test/ubuntu focal main

Output messages from installation and testing.sh

1
2
3
4
5
6
7
8
9
10
11
12
13
14
15
16
17
18
19
20
21
22
23
24
25
neil@neil-nb:~$ sudo apt install hello
正在讀取套件清單... 完成
正在重建相依關係
正在讀取狀態資料... 完成
下列【新】套件將會被安裝:
hello
升級 0 個,新安裝 1 個,移除 0 個,有 0 個未被升級。
需要下載 52.3 kB 的套件檔。
此操作完成之後,會多佔用 284 kB 的磁碟空間。
下載:1 http://ppa.launchpad.net/neillee1210/home-test/ubuntu focal/main amd64 hello amd64 2.10-2ubuntu3 [52.3 kB]
取得 52.3 kB 用了 1s (43.9 kB/s)
選取了原先未選的套件 hello。
(讀取資料庫 ... 目前共安裝了 255157 個檔案和目錄。)
正在準備解包 .../hello_2.10-2ubuntu3_amd64.deb……
解開 hello (2.10-2ubuntu3) 中...
設定 hello (2.10-2ubuntu3) ...
this is a test from Neil Lee
執行 man-db (2.9.1-1) 的觸發程式……
執行 install-info (6.7.0.dfsg.2-5) 的觸發程式……


neil@neil-nb:~$ dpkg -S testing.sh; testing.sh
hello: /usr/bin/testing.sh
this is a test from Neil Lee
neil@neil-nb:~$

原理

flash emmc layout

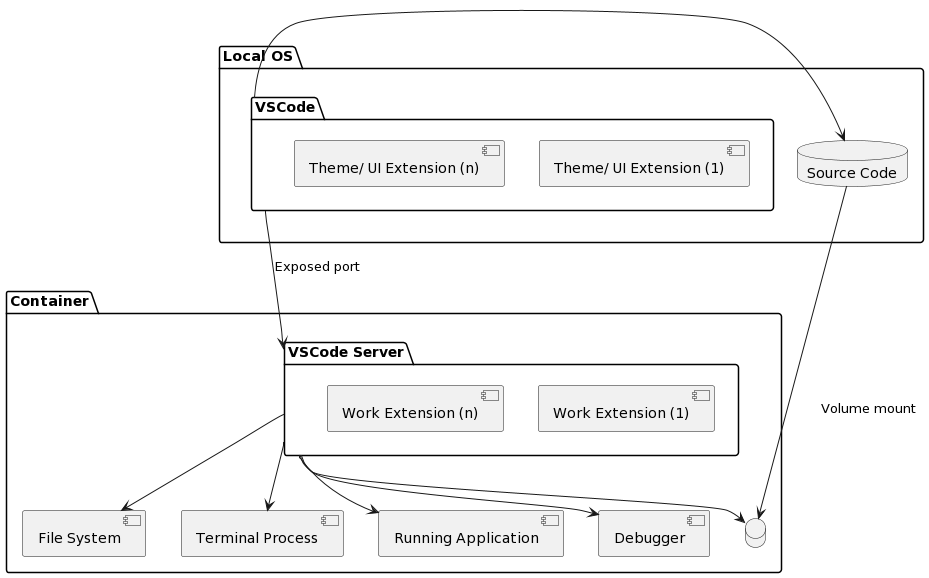
  • 使用Local OS環境來編輯程式原始碼或文件
    • 原始碼與文件存放在OS本機檔案系統
  • 使用Docker Container環境來進行程式執行(Runtime)與除錯
    • 原始碼與文件透過docker volume/folder mount到容器檔案系統
    • 執行/除錯環境所需的各式軟體套件安裝於容器(Container)與OS區隔,保護OS環境
    • 透過VSCode server,執行程式/進行除錯/Terminal操作皆可在OS中VSCode操作

安裝操作

Docker(Hexo server)

VSCode

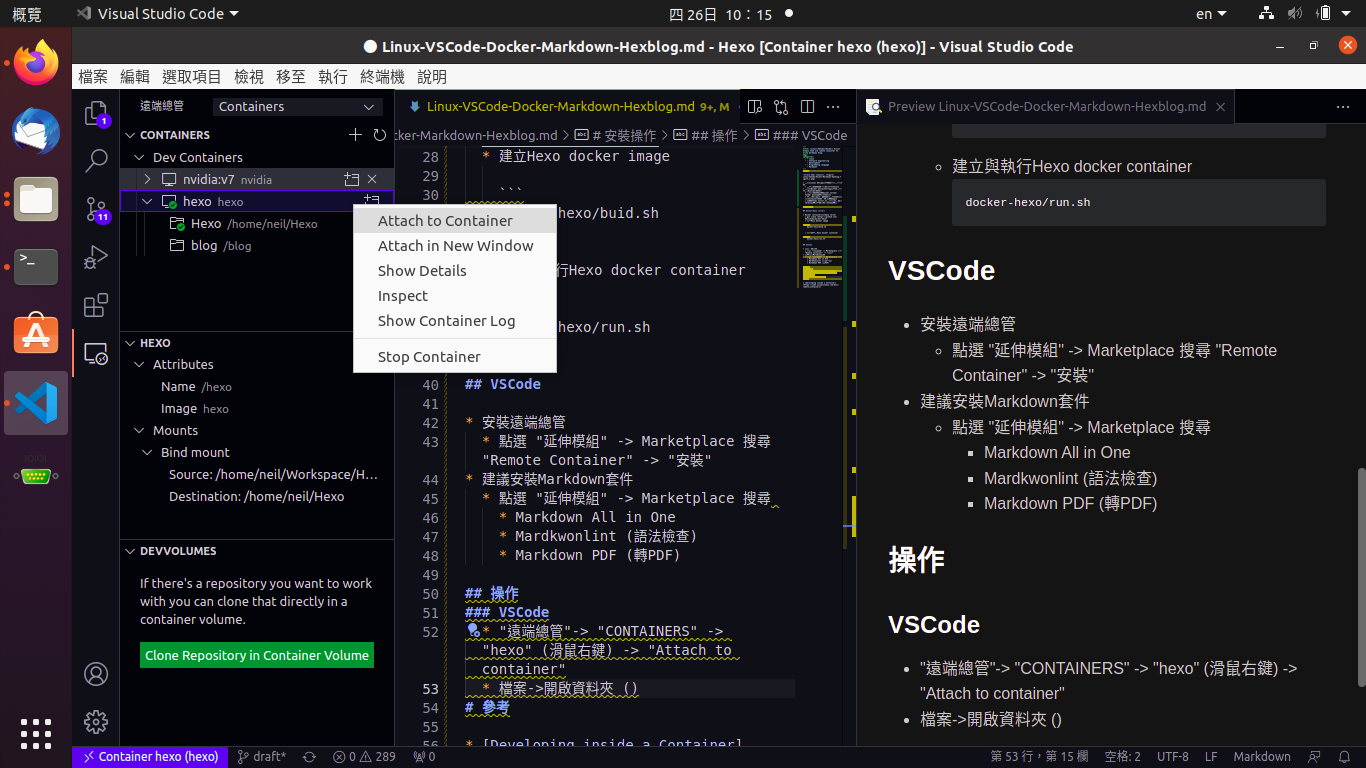
  • 安裝遠端總管
    • 點選 “延伸模組” -> Marketplace 搜尋 “Remote Container” -> “安裝”
  • 建議安裝Markdown套件
    • 點選 “延伸模組” -> Marketplace 搜尋
      • Markdown All in One
      • Mardkwonlint (語法檢查)
      • Markdown PDF (轉PDF)

操作

  • VSCode編輯原始碼或文件(Markdown編寫)

    • “遠端總管”-> “CONTAINERS” -> “hexo” (滑鼠右鍵) -> “Attach to container”
      flash emmc layout
    • 檔案->開啟工作區資料夾(Hexo資料夾)->進行Hexo blog post/ draft編寫
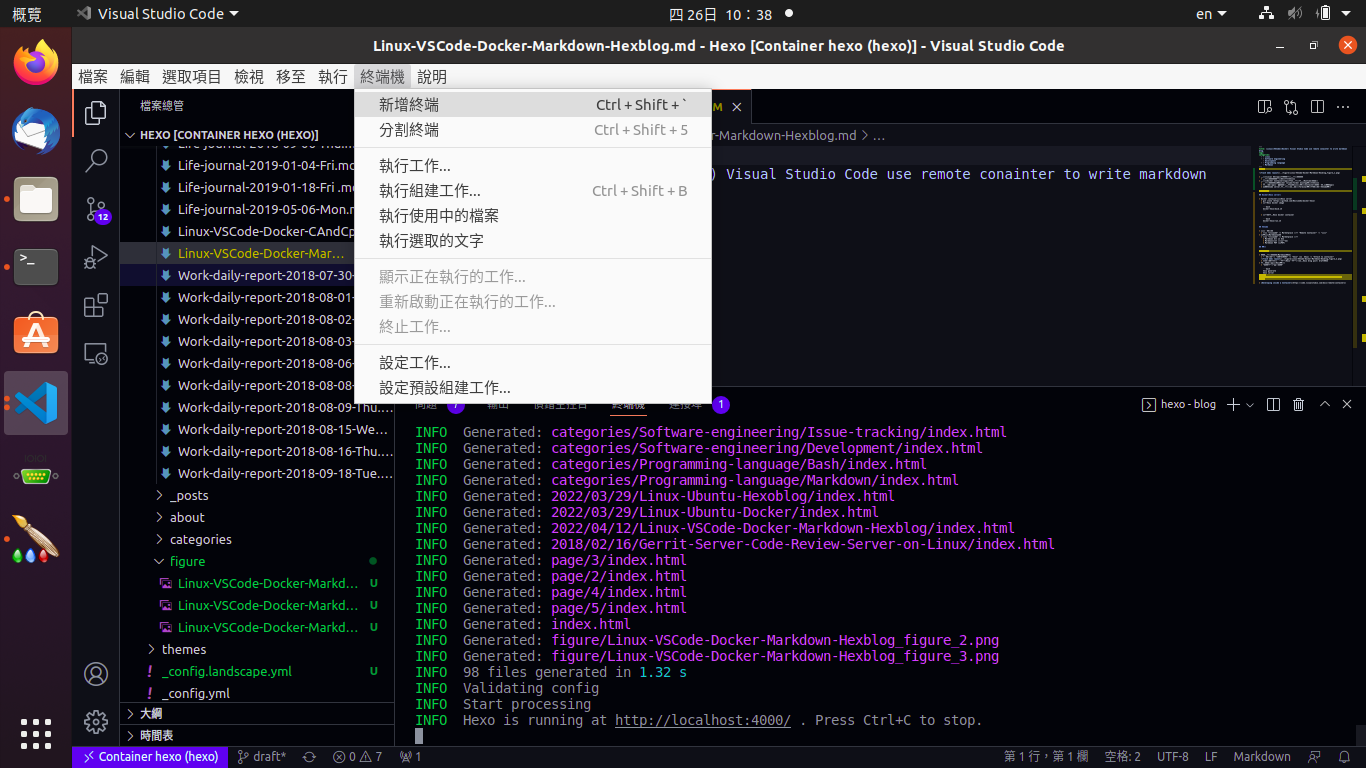
  • VSCode執行與除錯環境(Hexo操作)

    • “終端機”->”新增終端”

      1
      2
      hexo generate
      hexo server

    flash emmc layout

參考

環境

Ubuntu 20.04 (64 Bits)

安裝

執行下列指令

1
sudo apt-get install openconnect network-manager-openconnect network-manager-openconnect-gnome

設定

  • Ubuntu GUI 設定–>網路–>VPN–>Openconnect –> VPN Protocol(GlobalProtect)

環境

Ubuntu 20.04 (64 Bits)

安裝

執行下列指令

1
2
3
4
5
apt-get --yes install curl dirmngr apt-transport-https lsb-release ca-certificates
curl -sL https://deb.nodesource.com/setup_12.x | bash -
apt-get update
apt-get --yes install nodejs
npm install hexo-cli -g

基本操作

安裝Theme (範例: Next)

下載Next

1
2
cd hexo
git clone https://github.com/theme-next/hexo-theme-next themes/next

修改hexo/_config.yml

1
theme: next

撰寫Markdown

  • 草稿
    hexo new –draft
  • 草稿定案文本
    hexo publish

    產生靜態網頁

  • 僅文本內容
    1
    hexo generate
  • 包含草稿內容
    1
    hexo generate --draft

    啟動Web服務(預覽Hexo畫面)

    1
    hexo server

環境

Ubuntu 20.04 (64 Bits)

安裝

  • 執行下列指令
    1
    2
    3
    4
    5
    6
    7
    8
    9
    sudo apt-get remove docker docker-engine docker.io containerd runc
    sudo apt-get update
    sudo apt-get install ca-certificates curl gnupg lsb-release
    curl -fsSL https://download.docker.com/linux/ubuntu/gpg | sudo gpg --dearmor -o /usr/share/keyrings/docker-archive-keyring.gpg
    echo \
    "deb [arch=$(dpkg --print-architecture) signed-by=/usr/share/keyrings/docker-archive-keyring.gpg] https://download.docker.com/linux/ubuntu \
    $(lsb_release -cs) stable" | sudo tee /etc/apt/sources.list.d/docker.list > /dev/null
    sudo apt-get update
    sudo apt-get install docker-ce docker-ce-cli containerd.io

基本操作

Image操作

  • 安裝 (範例:ubuntu image)

    1
    2
    docker search ubuntu -f is-official=true
    docker pull ubuntu
  • 移除

    1
    2
      docker rmi <Image name/Image ID>
    * 操作內容

    docker run -it ubuntu /bin/bash

    1
    2
    3
    * 自訂Image
    * By Interaction
    1. 操作內容
      docker run -it ubuntu /bin/bash 
      
    1
    2
    3
    4
    5
    6
    2. 手動安裝環境
    3. 暫時離開container

    ctrl+p, ctrl+q

    4. 查詢container名稱
    docker container ls -a
    1
    5. 建立Image
    docker commit -m <message> -a <author> <container ID> <tag>
    1
    2
    * Dockerfile方法
    1. 編寫Dockerfile (範例: Hexo)
    FROM ubuntu MAINTAINER Neil ARG DEBIAN_FRONTEND=noninteractive ENV TZ=Asia/Taipei RUN ln -snf /usr/share/zoneinfo/$TZ /etc/localtime && echo $TZ > /etc/timezone RUN apt-get update RUN apt-get --yes install git RUN apt-get --yes install curl dirmngr apt-transport-https lsb-release ca-certificates RUN curl -sL https://deb.nodesource.com/setup_12.x | bash - RUN apt-get update RUN apt-get --yes install nodejs RUN npm install hexo-cli -g
    1
    2. 建立Image
    docker build -t <image name> -f <docker-file> <path>
  • Export Image

    1
    docker export <.tar>
  • Import Image

    1
    docker import <.tar>

    Container操作

  • 列出所有container狀態

    1
    2
    docker ps -a
    docker container ls -a
  • 移除所有停止的container

    1
    docker container prune
  • Detaching Without Stopping container

    ctrl + p, ctrl + q

  • Reattaching Container

    1
    docker attach <container>
  • 使用root身份登入

    1
    docker exec -u 0 -it <container ID> /bin/bash
  • Docker volume & network (host)

    1
    docker run --net=host -it -v <host path>:/<container path> <image ID> /bin/bash

    問題

    Container中apt install自動補全

    安裝bash-completion

    1
    apt install bash-completion

    編輯/bin/bash.bashrc

    1
    2
    3
    4
    5
    6
    7
    if ! shopt -oq posix; then
    if [ -f /usr/share/bash-completion/bash_completion ]; then
    . /usr/share/bash-completion/bash_completion
    elif [ -f /etc/bash_completion ]; then
    . /etc/bash_completion
    fi
    fi

    移除docker.clean

    1
    2
    rm /etc/apt/apt.conf.d/docker.clean
    apt-get update

更改Docker Image & Container預設安裝位置

方法一

停止docker daemon

1
sudo service docker stop

編輯/etc/docker/daemon.json,指定新位置

1
2
3
{
"data-root": "/path/to/your/docker"
}

複製現有docker images/ containers到新位置

1
sudo rsync -aP /var/lib/docker/ /path/to/your/docker

重起docker daemon

1
sudo service docker start

方法二

Stop docker daemon.

1
/etc/init.d/docker stop
1
ps aux|grep docker

Move the contents of /var/lib/docker to your new location.

1
mv /var/lib/docker /home/
1
ln -s /home/docker/ /var/lib/docker

Start docker daemon.

1
/etc/init.d/docker start

前言

  • 希望在Beaglebone black(BBB)上做一些開發,又能達成
    • Ubuntu系統
    • VNC遠端桌面操作
    • 輕量級的桌面系統(Window manager) -> 改善效能
    • 桌面被Render到Host(BBB)的Display -> 改善效能
  • 因此使用下列的安裝方式
    1. 安裝Ubuntu server,不要有桌面環境

    2. 安裝X11VNC (VNC server)

       sudo apt-get install x11vnc
      
    3. 安裝XVFB(X virtual framebuffer)

    4. 安裝LXDE (Lubuntu的Window manager)

       sudo apt-get install lxde
      
    5. 啟動XVFB

       export DISPLAY=:1
       Xvfb :1 -screen 0 1024x768x16 &
       startlxde &
       x11vnc -display :1 -bg -nopw -listen local_IP -xkb
      

延伸閱讀

  • sizeof( )是一個編譯時期的運算子,而非執行時期的運算子,所以當你程式編譯完成時,其值就已經決定了。

    • CPU/ OS 32-Bits

        int gIntArray[10];
        char gCharArray[10];
        void main(void)            
        {            
            printf("sizeof(gIntArray): %d", sizeof(gIntArray));            
            // 10 * 4 bytes
            printf("sizeof(gIntArray)/sizeof(gIntArray[0]): %d", sizeof(gIntArray)/sizeof(gIntArray[0]));
            // 10
            printf("sizeof(gIntArray)/sizeof(int): %d", sizeof(gIntArray)/sizeof(int));
            // 10
      
            printf("sizeof(gCharArray): %d", sizeof(gCharArray));            
            // 10 * 1 bytes
            printf("sizeof(gCharArray)/sizeof(gCharArray[0]): %d", sizeof(gCharArray)/sizeof(gCharArray[0]));
            // 10
            printf("sizeof(gCharArray)/sizeof(char): %d", sizeof(gCharArray)/sizeof(char));
            // 10
        }
      
  • 陣列大小的計算僅適用於靜態陣列,若是當成參數傳給 Function,Function收到的只是一個指標

    • CPU/ OS 32-Bits

        int gIntArray[10];
        char gCharArray[10];
        void main(void)            
        {
            function(gIntArray, gCharArray);            
        }
        void function (int intArray[], char charArray[])
        {
            printf("sizeof(intArray): %d", sizeof(intArray));            
            // pointer 4 bytes
            printf("sizeof(intArray)/sizeof(intArray[0]): %d", sizeof(intArray)/sizeof(intArray[0]));
            // 1 = (pointer 4 bytes) / (int 4 bytes)
            printf("sizeof(intArray)/sizeof(int): %d", sizeof(intArray)/sizeof(int));
            // 1 = (pointer 4 bytes) / (int 4 bytes)
      
            printf("sizeof(charArray): %d", sizeof(charArray));            
            // pointer 4 bytes
            printf("sizeof(charArray)/sizeof(charArray[0]): %d", sizeof(charArray)/sizeof(charArray[0]));
            // 4 = (pointer 4 bytes) / (char 1 byte)
            printf("sizeof(charArray)/sizeof(char): %d", sizeof(charArray)/sizeof(char));
            // 4 = (pointer 4 bytes) / (char 1 byte)
        } 
      
    • CPU/ OS 64-Bits

        int gIntArray[10];
        char gCharArray[10];
        void main(void)            
        {
            function(gIntArray, gCharArray);            
        }
        void function (int intArray[], char charArray[])
        {
            printf("sizeof(intArray)/sizeof(intArray[0]): %d", sizeof(intArray)/sizeof(intArray[0]));
            // 2 = (pointer 8 bytes) / (int 4 bytes)    
      
            printf("sizeof(charArray)/sizeof(charArray[0]): %d", sizeof(charArray)/sizeof(charArray[0]));
            // 8 = (pointer 8 bytes) / (char 1 byte)
        }
      
  • 所以並無法計算陣列的大小,一般解決的辦法是在呼叫前先計算好陣列大小,然後當成參數一併傳給 Function

    • CPU, OS 32-Bits

        int gInitArray[10];
        char gCharArray[10]
      
        void main(void)            
        {
            function(gIntArray, sizeof(gIntArray)/sizeof(gIntArray[0]));            
        }
        void function (int intArray[], int length)
        {
            printf("size of intArray: %d", length * sizeof(intArray[0]));
            // 10 * 4 bytes
        }
      

  1. 安裝TFTP Server

     sudo apt-get install xinetd tftpd
    
    • Ubuntu下TFTP是不能單獨運作的,需要xinetd這個網路管理的背景程式之支援。 於是我們同時安裝這兩個套件。
  2. 設定xinetd.conf

     sudo vi /etc/xinetd.conf
    
     # Simple configuration file for xinetd
     # Some defaults, and include /etc/xinetd.d/
     defaults
     {
     # Please note that you need a log_type line to be able to use log_on_success
     # and log_on_failure. The default is the following :
     # log_type = SYSLOG daemon info
     }
     includedir /etc/xinetd.d
    

    雖然我們可以將設定內容寫入此處,但還有更好的設定檔設定方法。用下列方法設定

         sudo vim /etc/xinetd.d/tftp
     <!-- --> 
         service tftp {
                 socket_type     = dgram
                 protocol        = udp
                 wait            = yes
                 user            = root
                 server          = /usr/sbin/in.tftpd
                 server_args     = -s /home/tftpboot
                 disable         = no
                 per_source      = 11
                 cps             = 100 2
                 flags           = IPv4
         }
    
  3. 重新讓xinetd讀入參數並重新啟動。

     sudo /etc/init.d/xinetd reload
     sudo /etc/init.d/xinetd restart
    
  4. 檢查TFTP是否真的在運作

     ls -l /tftpboot/
    
     total 0
     -rwxrwxrwx 1 davids davids 0 2006-03-27 23:04 hda.txt
    
     tftp 192.168.1.100
     tftp> put hda.txt
    
     Sent 722 bytes in 0.0 seconds
    
     tftp> quit
    
     ls -l /tftpboot/
    
     total 4
     -rwxrwxrwx  1 davids davids 707 2006-03-27 23:07 hda.txt
    

    看到以上訊息,恭喜你,你已經設定成功啦! 完成設定後將放置於TFTP的檔案移至 /tftpboot 目錄下。(注意tftpboot資料夾檔案的權限)

     sudo mkdir /home/tftpboot
     sudo chmod -R 777 /home/tftpboot
     sudo chown -R nobody /tftpboot
    

  1. 安裝VLAN(802.1Q)

     apt-get install vlan
    
  2. Load the 8021q kernel module

     sudo modprobe 8021q
    
  3. Ensure that this module gets loaded after a reboot by adding to /etc/modules:

     sudo  sh -c 'grep -q 8021q /etc/modules || echo 8021q >> /etc/modules'
    
  4. 替網卡加入VLAN

     sudo vconfig add eth0 100
     sudo vconfig add <Ether Card> <VID>
     sudo vconfig delete <Ether Card> <VID>
    
  5. 設定每個網卡對應VLAN的IP, netmask

     sudo ifconfig eth0.100 192.168.100.1 netmask 255.255.255.0
     sudo ifconfig eth0.<VID> <IP> netmask 255.255.255.0
    
  6. 測試VLAN是否作用,Ping 192.168.100.1/24,使用wireshark錄eth0封包

  7. 永久設定每個網卡對應VLAN的IP, netmask

     sudo vim /etc/network/interfaces
    
     auto eth0.100
     iface eth0.100 inet static
     address 192.168.100.1
     netmask 255.255.255.0